Setup/Calibration Wizard

Contents
To access this wizard connect to your mount and camera then click Wizards | Calibration Wizard...
After doing so you will see the first page of the wizard:
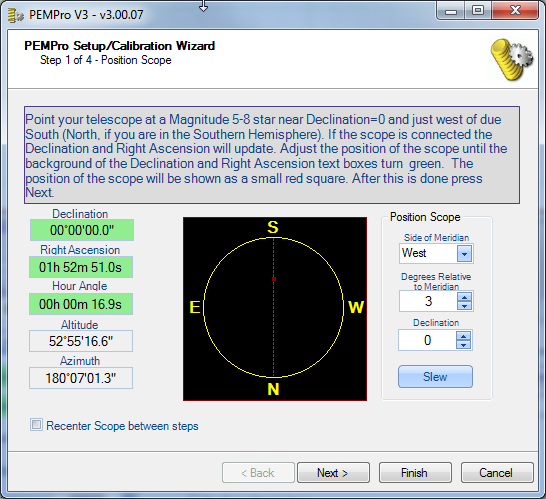
Step 1 confirms that your telescope is in the optimal part of the sky. The boxes on the left will be green when you are in the optimal part of the sky. The red dot graphically shows approximately where your telescope is pointing in the sky.
If you have a GOTO scope you can slew it to near the meridian using the Slew button.
Note: Even if the declination is considerably different than 0 and the declination box shows red it is ok to use the star if you have checked Adjust Data for Declination in the Settings menu of PEMPro. The maximum recommended declination is +50 degrees in the Northern hemisphere and -50 in the Southern Hemisphere.
Internally calculate Alt/Az - use this for scopes/mounts that do not return their Altitude/Azimuth position.
Recenter Scope between steps - during the calibration wizard the mount will be stopped and commands to move it will be issued. If you are using a camera with a small field of view you might want to check this option. Doing so will force PEMPro to re-center to the last RA/Dec location when you switch to another step of the wizard. You might want to disable this if you have a LX200GPS or similar mount as consensus is that the firmware has a bug which can cause a wild slew when a small distance slew has been commanded.
Click Next to continue.
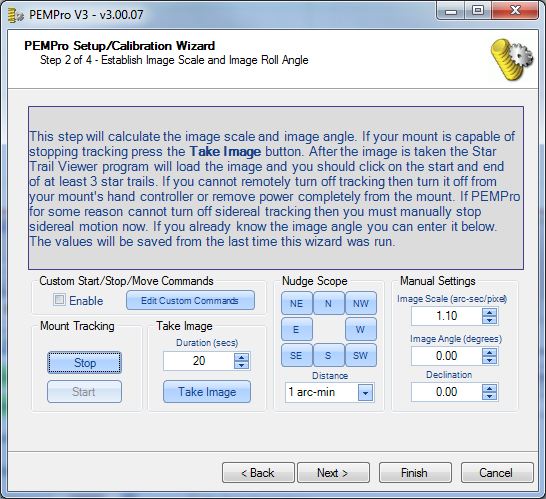
In step 2 mount tracking must be stopped manually (via the mount's hand controller) or by pressing Stop if your mount supports this feature (the Stop button will be enabled in this case). Alternatively you may wish to enable the Custom Start/Stop/Move Commands if your ASCOM driver has problems starting/stopping tracking. Please see this section for more details on setting up Custom Commands.
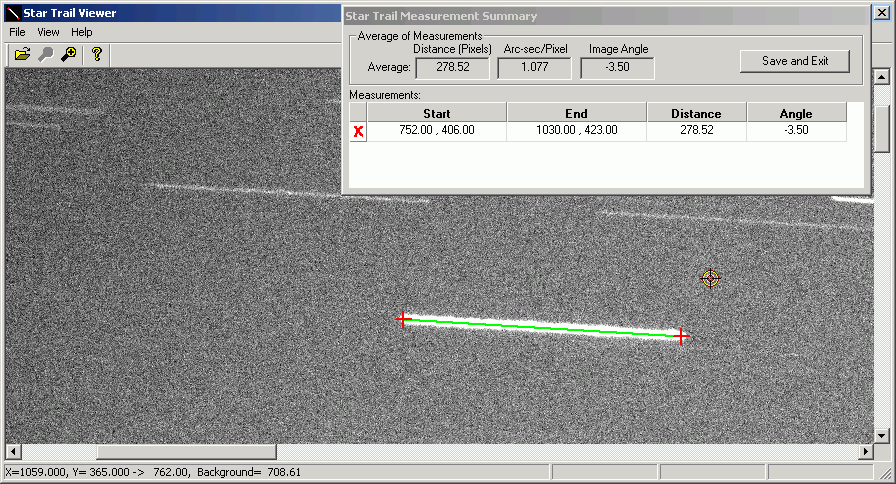
Once tracking is stopped, press Take Image. During the exposure all of the stars will trail because tracking is stopped. When done the image will be displayed in the StarTrailViewer, a separate application. You will then click on the both ends of several star trails. Since the sky moves at a very precise rate the length and angle of the trails allows the Image Scale and Image Angle to be calculated.
Note for Paramount Users: The Start/Stop buttons are both disabled for now because the Start/Stop Tracking feature of TheSky's scripting interface seems to be unreliable. To disable/enable tracking use this menu option in TheSky: Telescope | Options | Tracking |
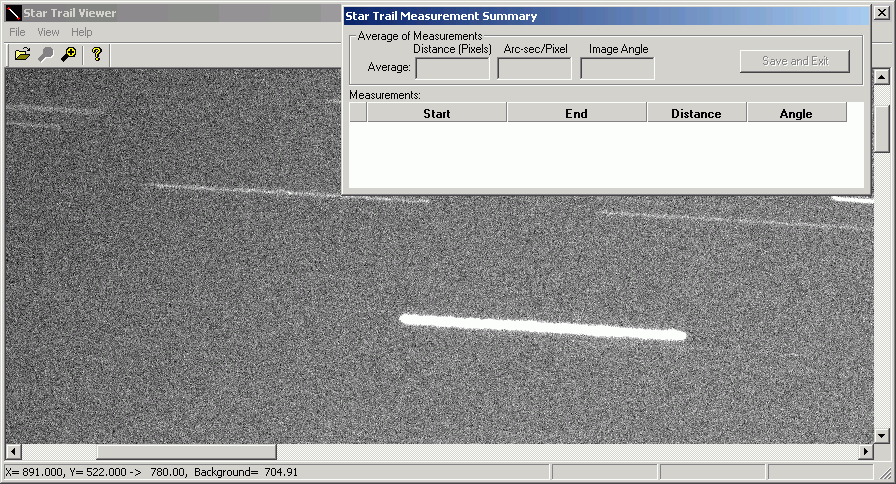
Now in the above image you can click the start and end of a trail and an entry will be added in the table. You should do at least three stars. If you make a mistake click the red X in the first column. When done press the Save and Exit button.
After the StarTrailViewer application closes click Next to continue from Step 2.
IMPORTANT: Make sure to turn tracking back on before proceeding to Step 3. If you forgot the Calibration Wizard will remind you to do so. |
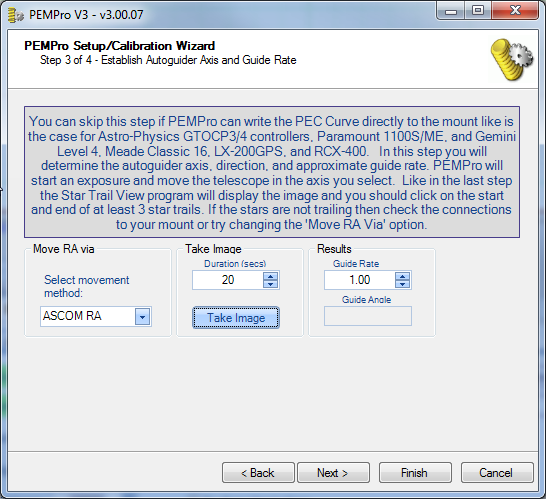
In Step 3 the autoguider axis and guide rate are determined. It is recommended that if you can use the camera relays you should use that at the movement method. An exception to this would be for mounts that use the Astro-Physics GTOCP3 controller, the Gemini Level 4 controller, Meade LX200-GPS, Meade LX200R, and Meade RCX-400. For these mounts you should select ASCOM RA. If this method doesn't work you can try using the Custom Commands, which can be setup in step 2.
Usually "Relay X" moves the RA Axis, but PEMPro will warn you if it does not. If the camera relays are not an option then you must use ASCOM to move the mount. Whichever method you select this step will confirm that the movement method is working properly.
Another image is taken and StarTrailViewer will display again, asking you to identify the start and end of several star trails.
After the StarTrailViewer application closes click Next to continue to the last Step.
In Step 4 the movement direction is determined.
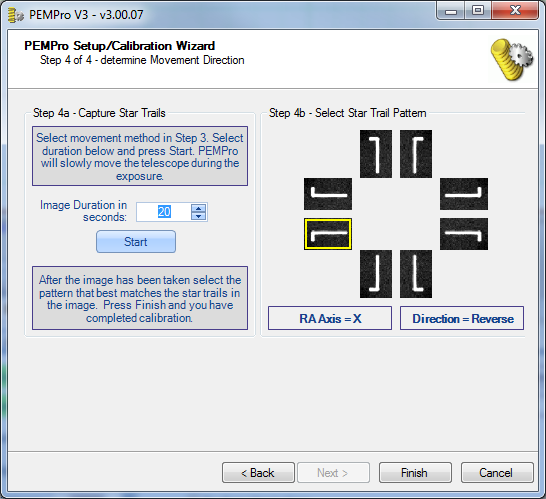
PEMPro will move the mount in RA and in Dec which will result in an L shaped star pattern for all the stars in the image. The StarTrailViewer application will again display. Remember the pattern and exit StarTrailViewer. When you are back at the Wizard pick the pattern that most closely resembles what you saw.
Click Finish to exit. You are ready to acquire periodic error data, after re-centering a suitable star.