Paramount GT-1100S and Paramount ME, ME II, and MX

Contents
PEMPro can create a raw PEC file for upload to the Paramount GT1100S, Paramount ME, Paramount ME II, and Paramount MX.
PEMPro offers the following advantages: 3.PEMPro works with cameras that MaximDL, CCDSoft V5, and AstroArt V3/V4/V5 support. PEMPro also natively supports all Meade DSI series cameras and video cameras. 4.PEMPro works with TheSkyX, TheSky6, and TheSky5. 5.PEMPro dynamically re-centers each subframe so it can passively track a star across the entire CCD chip instead of the smaller fixed tracking area that some other methods allow for. 6.PEMPro can use any arbitrary rotation of your camera. 7.PEMPro can use stars at any declination (seeing may be significantly better overhead). 8.PEMPro is already "tuned" for the harmonics normally found in Paramount MX, ME, ME II, and GT-1100S. It can also analyze and identify the other harmonics (using the frequency spectrum feature) that may be a sign of a mechanical problem. 9.PEMPro can be used for other mounts should you already have one or ever purchase one. |
Steps to program the Paramount:
1. Use the Mount Setup Wizard to create a new instance of the Paramount ME, ME II, MX, or GT-1100S. Make sure you select the appropriate mount type in the Wizard.
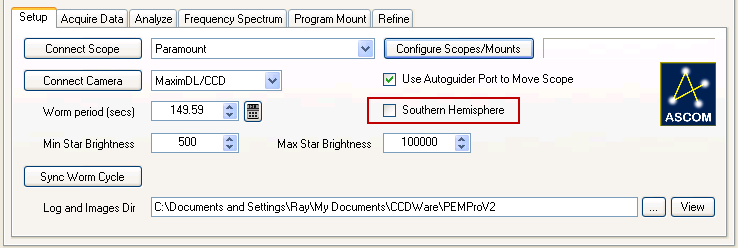
Also it is critical to have the Southern Hemisphere checkbox set appropriately on PEMPro's setup page. Only check this checkbox if you are in the Southern Hemisphere.
2. Synchronizing PEMPro to the Paramount's PEC Index
The Paramount controller internally maintains a PEC Index counter that identifies the current worm position and the PEC active "cell" in the controller's internal PEC table. In order to get the PEC curve's phase correct PEMPro must synchronize internally to this PEC index by reading the index and updating it in time.
If you are using TheSky6 or TheSkyX PEMPro will automatically synchronize to the Paramount GT1100S, ME, ME II, and MX when you connect PEMPro to TheSky6/TheSkyX.
Also, when using TheSky6/TheSkyX, PEMPro automatically re-synchronizes to the current PEC Index when you press Start on the Acquire Data tab. This means that you can freely move the mount before acquiring data without the risk of losing synchronization between PEMPro and your Paramount.
Extra Procedure for TheSky5 ONLY:
If you are using TheSky5, you must use the additional procedure to synchronize PEMPro before continuing:
A. Connect to the mount from the setup page. When doing so you will be prompted to connect to TheSky 5 or 6. Select whichever one you have installed and want to use.
B. In TheSky5/6 go To Telescope | Options | More Settings and select the Periodic Error Correction tab.
C. Note the running PEC index counter (it should be decrementing quickly).
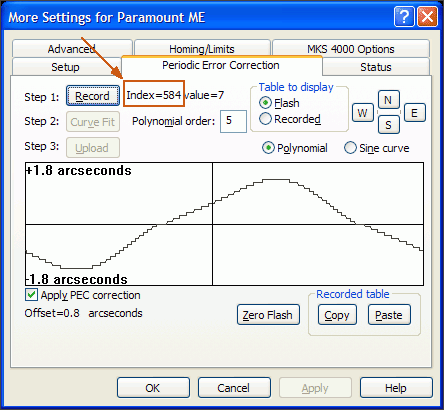
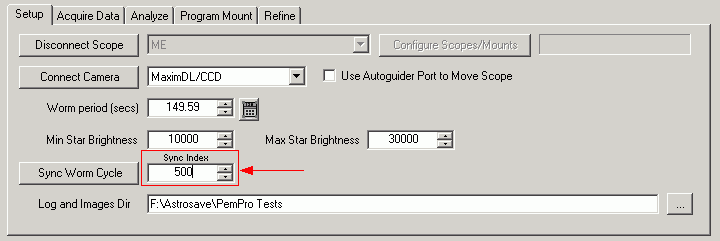
D. Go into the setup page of PEMPro and change the Sync Index value (only visible when the mount is connected) to a number lower than the running PEC index of the mount:
E. Watch the countdown in TheSky and as the PEC index in TheSky reaches the number you entered for the Sync Index press the Sync Worm Cycle button. If you make a mistake just try again.
IMPORTANT (this applies only when using TheSky5): Do not disconnect from the mount or move the mount in RA after synchronizing PEMPro. If you have to power cycle or Home the Paramount you will need to do this procedure again. |
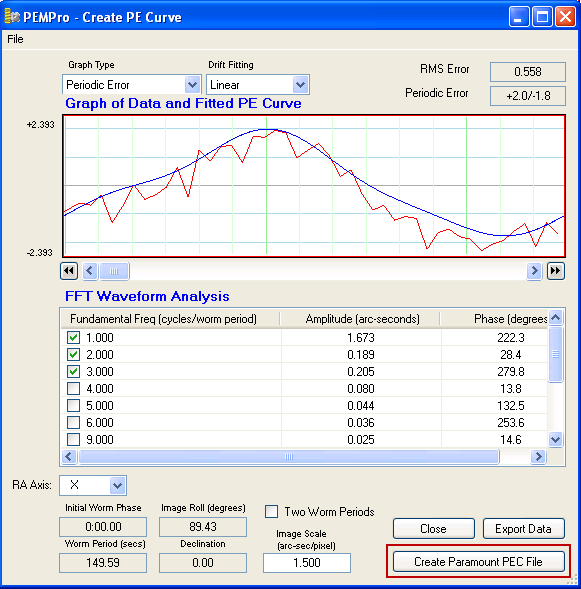
3. Building a Paramount PEC file in the PEMPro's Create Curves dialog.
A. Run the Calibration Wizard.
B. Synchronize PEMPro to the Paramount (see above).
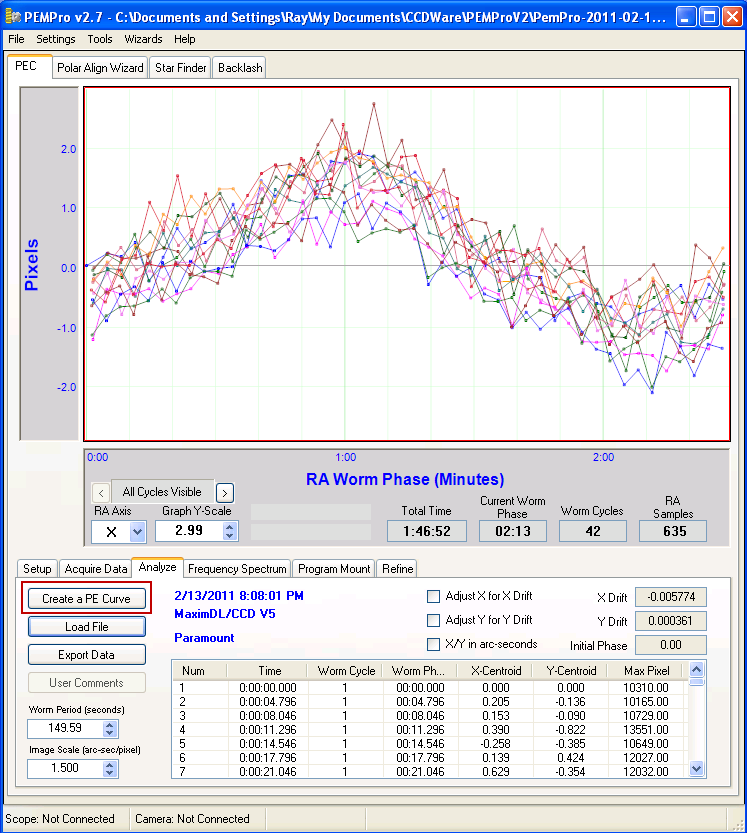
C. Acquire at least 5-6 worm periods of periodic error data.
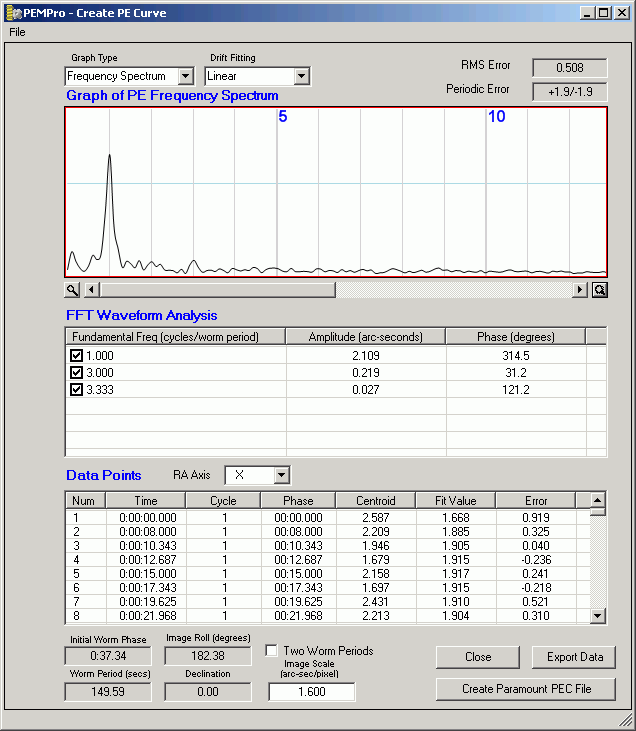
D. After acquiring data PEMPro will ask if you want to create a PEC curve. Click OK if you want to do that. If you later want to create a curve (or create an inverted curve) you can click the Create PE Curve, which is identified below:
E. Press Create Paramount PEC File to create the file. You will be asked if you need to invert the data. This depends on your camera configuration. Do not invert the data unless you know it needs to be inverted from previous experience.
4. Now, back in TheSky 5/6/X
If you are using TheSky5 or TheSky6 (for TheSkyX see below) click the menu Telescope | Options | More Settings and select the Periodic Error Correction tab:
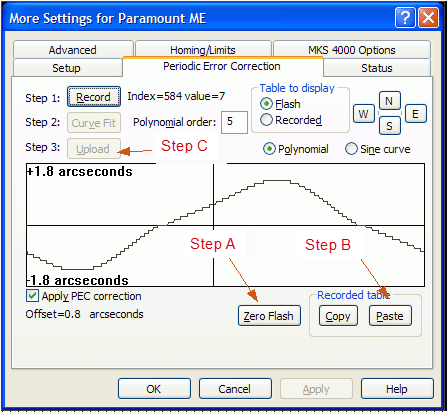
Step A: Click Zero Flash. Any PEC curve will be replaced by a straight line.
Step B: Click Paste. The PEMPro generated curve will be plotted and the Curve Fit and Upload buttons will be enabled.
Step C: Click the Upload button to send the curve to the ME firmware. IMPORTANT: Do not click the Curve Fit button.
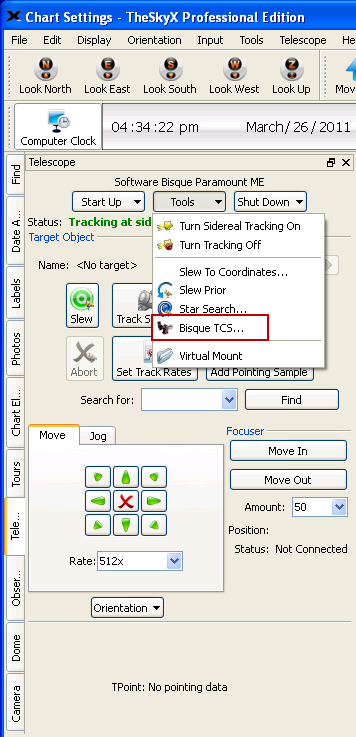
If you are using TheSkyX the procedure is a little different. Under the Telescope tab click the Tools button and then Bisque TCS.... (see the picture directly below):
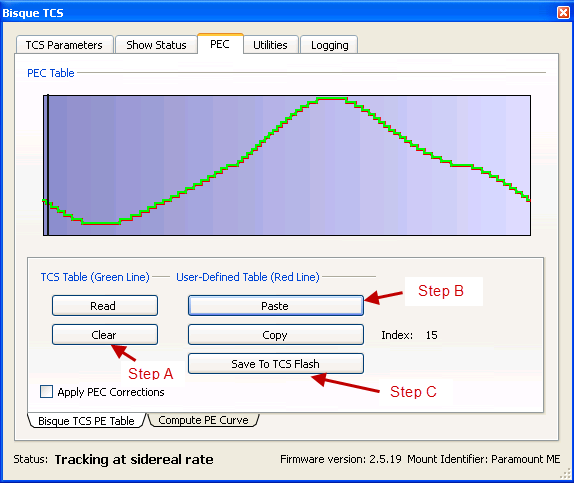
Once the Bisque TCS dialog opens follow the following procedure:
IMPORTANT: First click Read to load the current PEC curve. If you do not do this TheSkyX may not read the PEC data when you click Paste below.
Then:
Step A: Click Clear. Any PEC curve will be replaced by a straight line.
Step B: Click Paste. The PEMPro generated curve will be plotted.
Step C: Click the Save to TCS Flash button to send the curve to the ME firmware.
5. When upload is complete, it is recommended to reboot the mount.
For MKS3000 systems, the mount power must be recycled. For MKS4000/MKS5000 systems (the controller with the USB port), click the normal button under System reboot.
With the MKS3000 you will then need to re-home the mount and the uploaded PEC curve should show on the Periodic Error Correction tab. The MKS4000/MKS5000 should be ready to use the uploaded curve.
In either case it is recommended to enable PEC and acquire data again to make sure periodic error has been properly reduced. If periodic error seems to have been doubled instead of reduced that is a sign that the periodic error curve needs to be inverted. In that case you should go back to step 3D and invert the curve and upload the inverted curve.
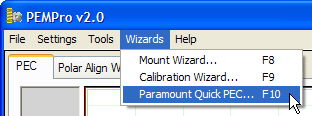
Paramount Quick PEC Wizard
With PEMPro you can also process the exact same CCDSoft Tracking files that you use as input to PrecisionPEC. PEMPro makes the process event simpler by providing this very easy to use wizard. You can access the wizard here:
The Wizard consists of a simple 4-step process. In Step 1 you select a previously created CCDSoft Tracking file to use. Press Open Log File and browse to the CCDSoft Tracking file that you wish to use.
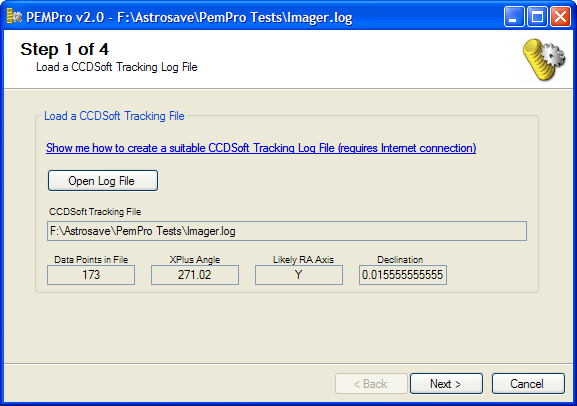
PEMPro improves on what PrecisionPEC does by de-rotating the data by the angle it reads from the CCDSoft tracking file. It further improves the calculation by compensating for the scope's declination when the log was captured.
Click Next to continue.
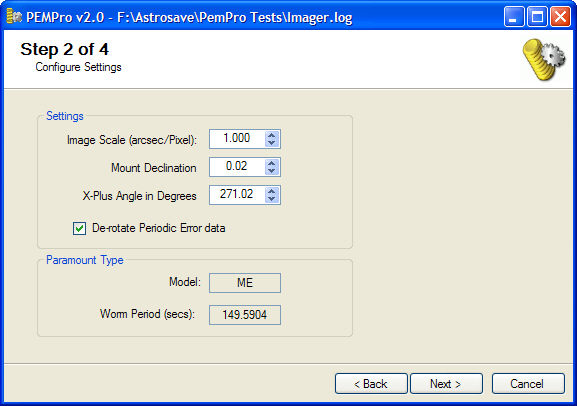
In Step 2, enter the CCD Image Scale and the Declination of the star you intend to use. PEMPro will automatically adjust for declination (and camera rotation if you check De-rotate Periodic Error Data). Click Next to continue.
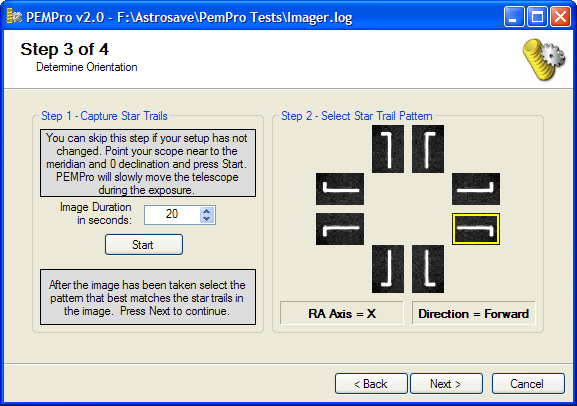
Step 3 is optional. You can use it to determine the camera angle but you can also change the direction later when creating a curve.
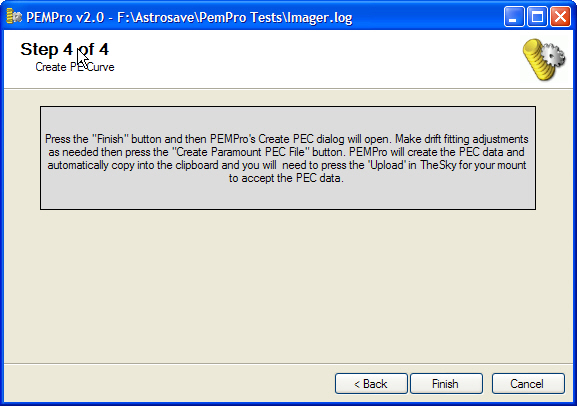
Step 4: You're done! Press Finish and the Create PEC Dialog will open and process the log file.
PEMPro will now display the processed curve:
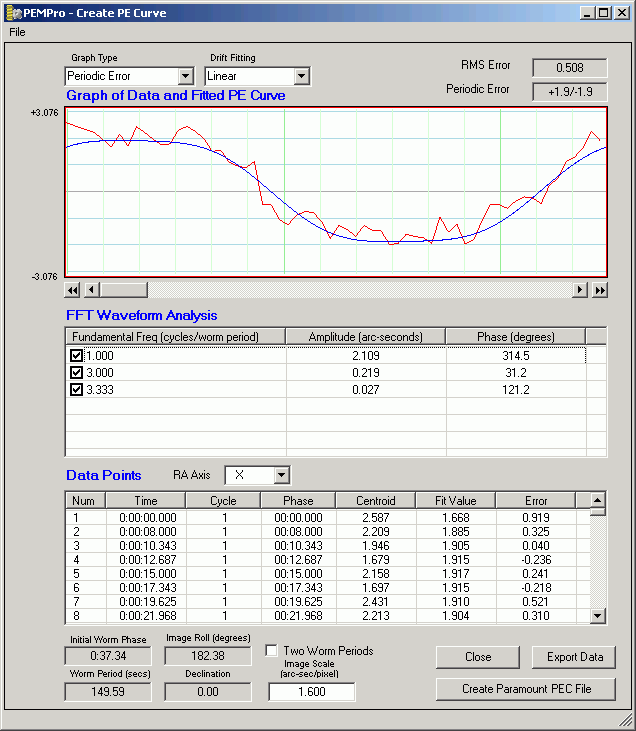
NOTE: PEMPro is automatically configured to process the native harmonics of the ME, ME II, MX, and 1100S. |
Now follow this procedure to get the PEC Curve to your mount.