Meade LX200-GPS, LX200-R, LX200-ACF

Contents
IMPORTANT: PEMPro only works in equatorial mode. Please make sure that you are using a "wedge" or other means to polar align and that " Polar" is selected in the mount's hand controller's "Telescope: Mount" menu ("Alt/Az" is the default setting). |
These directions apply specifically to the Meade LX200-GPS, LX200-R, and LX200-ACF. PEMPro will be able to directly read/write to the mount's PEC table with all firmware versions 2.0 and later however the procedure is different depending on the firmware.
LX200-GPS/R/ACF Firmware Version 4.0 and later
LX200-GPS Firmware Version 3.0i and earlier
Version 4.0 and later firmware
PEMPro has some very nice features for the LX200-GPS/R/ACF series of mounts. PEMPro can directly upload a PEC curve to either the normal or Factory PEC table with the firmware 4.0l or later.
Here are the steps you should follow:
Step 1: If you haven't done so already you should use the Mount Wizard to create a new instance of the LX200-GPS/R/ACF mount. Make sure Southern Hemisphere is checked on the Setup page if you are located south of the equator.
Step 2: Locate a 5-7th magnitude star near the meridian and 0 declination.
Step 3: Connect to your mount, camera control program and use PEMPro's Calibration Wizard to set up all of PEMPro's important parameters. Use "ASCOM" as the movement method. You should always run the Calibration Wizard at least once if you are going to acquire data. You will also want to run it again if you change the camera angle, telescope, image train, etc.
Step 4: After completing the calibration wizard press the Hand Box button:
This will bring up the LX200-GPS hand box window shown below. From this dialog box you can remotely control the telescope. The display at the top of the dialog shows what is actually being shown on the Hand Box. Normally this is updated about once every 5 seconds but will be updated immediately after you press any button. It updates faster (0.2 seconds) if the RA Segment is being shown.
Pressing any of the buttons outside of the Quick access area will emulate a button press on the Hand Box.
Also note that at the bottom is the telescope's current Declination, Right Ascension, and Hour Angle.
The hour angle is especially useful because it tells how far the mount is pointing from the meridian. The meridian runs overhead from north to south. Objects rise in the east, transit the meridian, and set in the west. An object on the celestial equator (declination = 0) takes 12 hours to cross the sky from east to west. Hour angle (HA) is defined as the length of time since an object transited (crossed) the meridian. So, if HA is negative the mount is to the east of the meridian, if it is positive it is west of the meridian.
There are six "Quick Access" buttons that you might find useful:
Focus In: Pressing this will move the focuser in.
Focus Out: Pressing this button will move the focuser out.
You can find more details about using these buttons in the section on focusing below.
PEC On: Pressing this will enable the mount's PEC.
PEC Off: Pressing this will disable the mount's PEC.
RA Seg: Shows the running RA PEC segment. PEC must be on for this to display.
Sync PE: Pressing this will synchronize PEMPro to the mount's RA PEC Segment counter. You should press this once when before you start acquiring data and whenever you notice the counter does not look synchronized in PEMPro. The Hand Box and/or PEMPro may not update immediately so they may not always look exactly synchronized. In general, if the counts ever are more than 1 unit apart then it is time to Sync PE again. It is always very quick and easy to use this button, so if you are unsure just use it.
IMPORTANT: If you slew or move the telescope you will need to resynchronize PEMPro if you want to acquire more PE data. Once the data is synchronized you will be able to create PEC curves immediately afterwards or at any time in the future. |
If you have High Accuracy Sync checked (recommended) then PEMPro will more accurately calculate the worm phase of the mount. It does this by averaging the time at which the segment counter changes 15 times. This takes about 35 seconds but it improves the accuracy of the resulting worm phase that PEMPro can use to about +/- 0.1 seconds. Without this option checked the worm phase is accurate to only about +/- 1 second because the hand box updates its display at somewhat irregular intervals.
Step 5: Synchronize PEMPro to the LX200-GPS. First you should erase the mount's PEC table. To erase the mount's PE table click Clear PEC and then To Mount, as shown below:
Once the PEC table has been erased, you can very easily synchronize PEMPro to the mount with the Meade Hand Box utility described above. Just press the Sync PE button and you are done.
To get and analyze the raw PE in the mount you must first turn off the mount's PEC. To do that, press the PEC Off button on the Meade Hand Box utility. Once you have done that you can click to the Acquire Data tab in PEMPro and collect data. You need to record at least 48 minutes of data (two 24-minute cycles).
To get and analyze the residual PE in the mount after a PEC curve has been uploaded (see below) you must first turn on the mount's PEC. To do that, press the PEC On button on the Meade Hand Box utility. You can then proceed as before to measure the periodic error of the mount.
Uploading the PEC curve to the mount
After synchronizing to the mount you can follow the normal procedure for acquiring data and creating a PEC curve. After you have done these two steps you can upload the curve directly to the mount from the LX-200 GPS tab. The upload only takes a few seconds.
Press the From Created PE Curve button. Note that the curve will be inverted if the Movement Direction in the Settings Summary is set to Reverse. If you don't want the curve inverted change the movement direction to Forward in the Settings Summary dialog and press From Created PE Curve again.
IMPORTANT: If you are in the Southern Hemisphere check Southern Hemisphere on the setup page . If you are in the Northern hemisphere make sure this checkbox is cleared. |
This will load in the PEC data from the curve you just created. You can also from this page load the PEC curve from the mount (From Mount) or from a file (From File). If you loaded the PEC curve from the mount you can display the factory PEC curve by checking the Factory PEC checkbox.
After loading the curve press the To Mount button to finally update the LX200's PEC. At this point you can enable PEC on your LX200 from the Meade Hand Box utility.
Modifying the Periodic Error Curve
Sometimes you may need to do an operation on the entire curve. For instance, clearing the PEC places a "0" value in each "cell" of the PEC data.
Shifting the PEC curve is an advanced feature. You might want to shift the PEC curve if you think the PEC curve is out of phase with the mount. Usually you will not have to use this capability.
<-Shift - Shifts the curve left by the number of cells in the Shift Value field. The cells of the LX200 are about 2.4 seconds each so that represents the time shift of one cell. Note that since the left hand edge of the graph always starts at 0 the whole level of the curve will change as you shift, however the shape and magnitude of the curve will not change. Here is a picture showing that:
-----------------------------------
Shift-> - Shifts the curve right by the number of cells in the Shift Value field. The cells of the LX200 are about 2.4 seconds each so that represents the time shift of one cell. Note that since the left hand edge of the graph always starts at 0 the whole level of the curve will change as you shift, however the shape and magnitude of the curve will not change.
Invert - Inverts the curve as shown below. Invert multiplies each cell of the curve by -1, so it essentially changes the sign of the curve. You will need to use this function if after applying a PEc curve to your mount its PE goes up instead of down.
Reverse - Reverses the order of the cells. If there are 200 cells, then cells 1 and 200, 2 and 199, 3 and 198, etc., are swapped. Usually you will not have to use this function. Here is a picture showing this:
Smooth - Does a very modest smoothing of the curve. The Smoothing consists of doing a weighted average of each cell with its the two nearest neighbors. It's purpose is to average out rough spots in the PEC data. Usually you do not want to use this function on a PEMPro-generated curve. You would only use it on a curve that is in the mount that was created by autoguiding.
Scale - Scale is another advanced function. It multiplies every cell by the Scale Value. You could use it to adjust your PEC curve if your image scale was set incorrectly.
Clear PEC - Fills the entire PEC table with 0's.
IMPORTANT: After making adjustments to a PEC curve with any of the above buttons you will need to write it to the mount with the To Mount button.
Refining the Periodic Error Curve
Because of various reasons the very first curve you program into the mount may not result in a perfect result. To produce a more accurate curve the original curve (with the mount's PEC off) is refined by adding to it the residual PE recorded by PEMPro with PEC on. This procedure may be done a number of times to obtain the best possible accuracy.
For a case study which involves refining curves go here.
Focusing with the Hand box Window
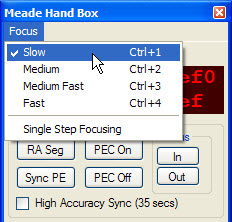 The hand box window has buttons to move the focuser in and out. The speed can be set in the Focus menu as shown to the right. There are four speeds available: Slow, Medium, Medium Fast, and Fast. There are also short-cut keys, CTRL-1 through CTRL-4, which allow you to change speed without directly accessing the menu.
The focuser will start moving when you press the In or Out button and keep moving until you release the button. However, if Single Step Focusing is checked, then each press of the In or Out button will move the focuser for about 1/100th of a second. The timing should be accurate as the command uses the Meade "FP" command which specifies an exact number of milliseconds to move for the LX200GPS and number of encoder ticks to move for the RCX400.
Editing PEC Cell Data
You can also edit data in individual cells.
You can double click anywhere in the graph area and that will find and highlight the line in the table associated with that point on the graph. Then if you double click the table entry that will bring up a dialog that allows you to manually edit the data. This is what that dialog looks like:
Make your changes and press Close to exit the dialog. Changed values are reflected on the graph and can be written to a file or back to the mount.
An Important Note about the Meade PEC Utility.
The Meade PEC Utility can read the PEC data from your mount just like PEMPro does. The Meade utility always displays the data from the first PEC cell to the last cell, which, if you are located in the Northern Hemisphere is reversed from the way the PEC data is actually played back with PEC running. That is, the mount starts with the last cell and decrements when in the Northern Hemisphere. PEMPro will automatically reverse the data when displaying it after a From Mount if the Southern Hemisphere flag (on the Setup page) is not checked. Thus PEMPro's display of the mount's PEC data will look different from that which the PEC utility displays. This is expected and does not represent any problem with PEMPro.
Version 3.0i and earlier firmware
These directions apply specifically to the Meade LX200-GPS with firmware version 3.0i and earlier installed (Note: all LX200-R and LX200-ACF telescopes have later firmware versions than this) . To get the best performance from PEMPro it is recommended that you synchronize the mount's PE cycle to PEMPro.
An overview of the procedure is as follows:
1. You must start a Train PEC in your hand controller.
2. PEMPro will send a move sequence to the mount.
3. After PEC training is done PEMPro will download and analyze the data. The mount's phase will be accurately determined so that the PEC curve that PEMPro creates can be directly loaded into the mount without having to go through a program mount stage.
This also has the advantage of using the data at any later time as the data is phased perfectly to the mount.
So, to use this procedure please follow these steps:
Step 1: Make sure the LX200-GPS is selected as the mount type in PEMPro's Mount configuration dialog:
Step 2: Connect to your mount and camera control program and use PEMPro's Calibration Wizard to set up all of PEMPro's important parameters. Use "ASCOM" as the movement method.
Step 3: With the mount and camera still connected press the Synch Worm Cycle button on PEMPro's Setup page.
Step 4: A wizard dialog will pop up asking you to first clear your PEC.
Press Next to continue. PEMPro will automatically zero the PEC table contents of your LX200 GPS.
Now on your Meade hand box start a PEC record. To do this Select "Train" from the R.A. PEC menu (in the "Setup: Telescope" menu) and press ENTER.
After you start the PEC training on your LX200 (which will last about 8 minutes) return to PEMPro and press the Start Sync button. Once you do that PEMPro will do a couple things:
1. Start updating the timer window to the right for your reference. PEC programming takes between 8 and 8 1/2 minutes so wait at least this long before going to the next step.
2. PEMPro starts a one minute internal timer before sending pulses. You will see the progress bar fill up as that time interval passes. Once reached the progress bar will reset and start over, now showing the progress of the sync pulses.
After about 9 minutes have passed press the Next button. PEMPro will download and analyze the PEC data and set PEMPro's internal phase to match the LX200's phase. Now you can Acquire data and write it directly to the mount as shown earlier on this page.
IMPORTANT: If you slew or move the telescope you will need to resynchronize PEMPro if you want to acquire more PE data. |