Declination Backlash Exerciser

Contents
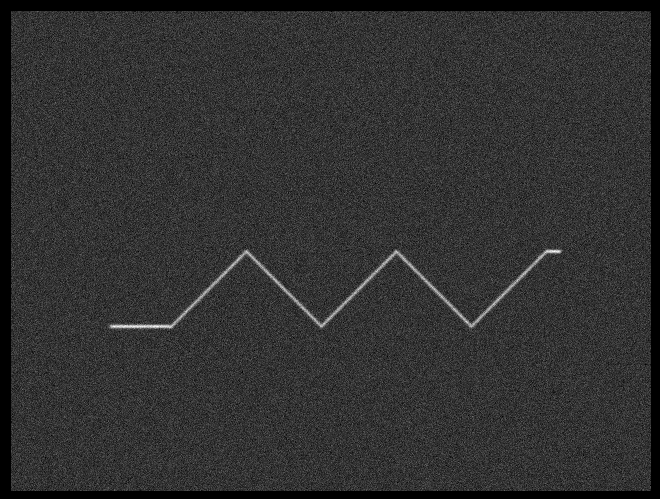
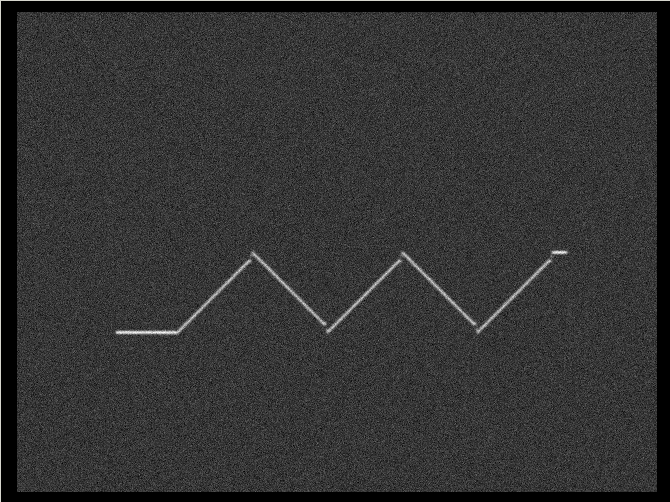
This tool allows you to assess the Declination backlash characteristics of your mount. It works by turning off RA tracking and making a series of alternating North and South moves. This produces a zigzag pattern like shown in this snapshot:
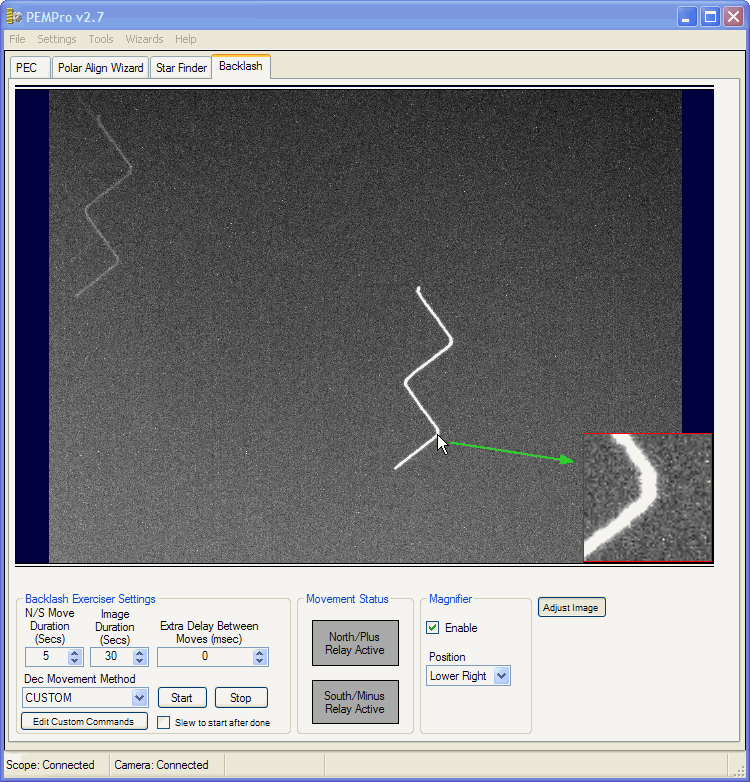
The controls are very simple:
N/S Move Duration (Secs): Controls the duration of each discrete North and South move. The moves will occur at the mount's current guide rate.
NOTE: Most mounts do not do well with a very short duration, so if you see an irregular saw tooth pattern you might want to try increasing the duration. 5 seconds is typically a good duration to try. |
Image Duration (Secs): Controls the duration of the entire image.
Dec Movement Method sets the movement method.
ASCOM Dec -RA: first stops RA tracking then issues Dec moves while tracking is stopped. Unfortunately some mounts don't allow any PulseGuide commands, which PEMPro uses to move the mount, with tracking disabled. An alternative is to use the CUSTOM move method below.
ASCOM Dec +RA: starts an RA move and simultaneously issues Dec moves. This method only works if the mount can do asynchronous ASCOM PulseGuide commands (many mounts can't do this). An alternative is to use the CUSTOM move method below.
RELAY X: Issues moves via the X relay.
RELAY Y: Issues moves via the Y relay. RELAY Y usually moves the declination axis.
CUSTOM: Allows you to send low-level commands to the mount to start/stop tracking and to issue moves East, West, South, and North. You would want to use this option if none of the above methods work and you have access to the low-level protocol definitions for your mount. See this section for more details.
Extra Delay Between Moves (msec): This inserts an extra delay after the completion of a move. This may be needed with some telescopes because they might ignore the new move command because the old move has not completed. You should experiment with this setting if the star pattern does not look like a saw tooth.
Start/Stop: Before the Start button is enabled you must connect to the scope and camera on the Setup tab of the PEC page. Clicking Start will start a camera exposure and telescope movements. If you want to cancel the movements click Stop.
Magnifier: You can enable the Magnifier by clicking the Enable checkbox. Then as you move the mouse over any part of the image it will be magnified in the small box in one of the corners. The box can be placed at any of the four corners by changing the setting of the Position combo box. You can use the Magnifier to closely examine the declination direction transitions.
Adjust Image: Clicking this will bring up the Histogram Stretch tool which will allow you to do a linear stretch of the image.
Interpreting the results
There are really three cases that will help you determine how to adjust your backlash:
A. Under-corrected Backlash
Under-corrected backlash has flattened peaks at each direction change. You should increase your scope's Dec backlash setting if you see this pattern.

B. Over-corrected Backlash
Over-corrected backlash has jumps at each direction change. You should decrease your scope's Dec backlash setting if you see this pattern.
C Properly corrected Backlash
When backlash is properly corrected the peaks look sharp at each direction change. This indicates your telescope will exhibit very little, if any, guiding degradation because of Dec backlash.