Acquiring Periodic Error Data

Contents
Before acquiring data you should run the Setup/Calibration Wizard. PEMPro has the ability to work with stars up to 80 degrees declination but it is recommended that you choose a star within 0 degrees and 65 degrees declination (North or South of the Celestial equator).
Center the brightest star and take a half second exposure. If the brightness of the star is between 1,000 and 20,000 that is a good star to use. You can try shortening or lengthening the exposure to get it in that range but it is recommended to use a star that allows you to use an exposure between 0.10 and 1.0 seconds.
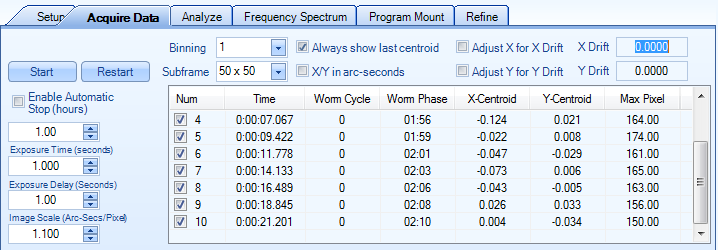
Click on the “Acquire Data” tab to reach this page. The Start button will be enabled if the camera is connected. If it is not go back to the Setup page and press Connect Camera.
Before pressing the Start button point your telescope to a 5-6th magnitude star near 0 degrees declination and near the meridian (due south in the Northern Hemisphere, due north in the Southern Hemisphere). If you are working with a German equatorial mount you may want to choose a star just west of the meridian so you do not have to worry about the telescope striking the pier. An easy way to confirm that everything is OK is to run the Setup/Calibration Wizard immediately before acquiring data.
IMPORTANT: You can also choose a star to the East of the meridian but you should start sufficiently east of the meridian so that the entire acquire data process does not result in the mount crossing the meridian. Allowing the mount to cross the meridian might cause complex drift errors from shifting weight that cannot be removed. |
Check the correctness of the value in the Image Scale field. This value should match what was calculated by the Setup/Calibration Wizard set it to in the Mount/Scope Dialog, however you can change it here if needed and it will be saved with the other scope/mount parameters.
Note that it is VERY IMPORTANT to set the Image Scale correctly before capturing Periodic Error data and analyzing the resulting log file. Image Scale is used to calculate actual periodic error and ultimately for calculating the pulse durations when playing back the fitted periodic error to your mount, or, in the calculation of a PEC curve that PEMPro can upload to your mount (if your mount has that capability).
If you are not certain that the image scale is correct please run the Setup/Calibration Wizard. In fact it is recommended that you run it at least once at start of each PEMPro session where you plan to acquire data. The wizard not only calculates image scale but calculates the camera angle and scope declination which are used respectively to de-rotate the acquired pixel coordinates and apply declination compensation.
Enable Automatic Stop (hours): When enabled PEMPro will automatically stop mount tracking after the corresponding number of hours has passed.
Exposure Time : On a night with good seeing try selecting between 0.5-1.0 seconds. If seeing is poor then try 1.5-2.0 seconds. PEMPro will calculate the mid point of the exposure and compensate for that when calculating a PEC curve.
Exposure Delay: Typically set to 0.1-1.0 seconds. You may want to use a longer delay if you have a slower PC and the user interface seems sluggish.
Binning: Typically you will only want to bin if you are very much over-sampling the seeing (0.3 arc-secs or less image scale).
IMPORTANT: If you don't use 1 for binning make sure you adjust the image scale to match (it is not automatically updated). For example, if Image scale is 1.50 arc-seconds per pixel at 1x Binning then enter 3.0 arc-seconds for 2x binning, or 4.5 arc-seconds for 3x binning.
Subframe: When you press Start PEMPro takes a full-frame image to locate a suitable star. It looks first in the center of the image (then outwards) for a star between Minimum Brightness and Maximum Brightness, which are defined on the Setup page. After this it only takes smaller subframe exposures around the star so downloads are very quick. It automatically tracks the star so you don't have to worry that the star will fall off the sub-frame. There are four subframe options: 16x16, 24x24, 50x50 (recommended), and 100x100 pixels.
Image Scale: The image scale of the loaded data. Note that if you change binning you must edit this value to reflect the image scale. Note that you can alter this before creating a PE Curve.
Start: Pressing this button will take an initial full-frame exposure to locate the brightest star (the one you should have centered earlier), followed by a number of smaller images the size of the subframe you selected. Once pressed the name of the button becomes Stop. Pressing the Stop button will stop the exposure sequence. Note that is a long download is in progress the stop operation might not seem to happen until the image download is complete.
Restart: This button will be enabled if you previously pressed Start and a subframe has been established. That is, it skips the full-frame download, which can be time-consuming, and uses the last used sub-frame to re-locate the star. If the star has drifted out of the sub-frame you can try increasing the subframe size or simply press Start which will take a full frame image.
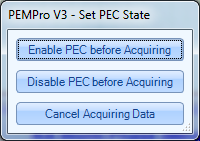
If you have an Astro-Physics GOTO mount and it is connected when you press the Start button, a pop-up dialog will appear (see to the right) that will ask you if you want to enable PEC or not. If you do not have that type of mount or you are not connected to the mount then a warning dialog will display asking you to make sure you have set the mount into the proper mode (Periodic Error Correction ON or OFF) before you start recording data.
A log file with the name format PEMPro-‘Date and Time’.Txt is created in the Log directory (defined on the Setup page). Each data point will be plotted and each cycle of the worm gear will be plotted in a different color.
Note that one of the axes is RA and the other is Dec so if you are unsure which is which you may want to try switching the Axis plotted with the RA Axis combo box. If the plot is nearly linear then you are probably looking at the declination axis. However, if you used the Calibration Wizard then PEMPro will use the camera angle to de-rotate the data it acquires so that the X-axis contains the RA data.
You can also change the scale of the graph by entering a number in the Graph Y-Scale edit box.

Always show last centroid : If checked, will force the table to scroll to the last data observation.
X/Y in arc-seconds : If checked, will multiply the X/Y centroids by the Image scale you entered in the setup page. It will also repaint the graph.
Adjust X for X Drift : If checked, will recalculate the X-centroids accounting for the 50-point moving average of the trend of the star’s movement in the X-axis. This feature does not alter the raw data in any way, just what is displayed in the graph and in the table.
Adjust Y for Y Drift : If checked, will recalculate the Y-centroids accounting for the 50-point moving average of the trend of the star’s movement in the Y-axis. This feature does not alter the raw data in any way, just what is displayed in the graph and in the table.
User Comments
PEMPro allows you to alter the default filename and add comments to the log file automatically created when doing an Acquire Data. This feature can be enabled/disabled from the Settings Menu. When off, PEMPro automatically creates the files with the default Filename format (e.g., PEMPro-Date-Time.Txt) in the Images and Logs directory. When on, when you start an Acquire Data a Dialog pops up with an option to change the filename and add a comment. When the dialog opens the default Time/Date encoded filename is automatically displayed so that you can keep that if you want.

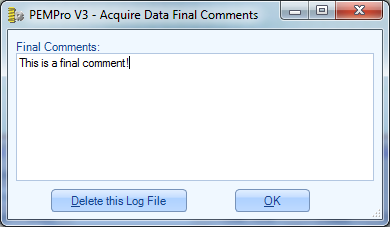
When the Acquire Data is stopped another dialog appears asking you to add any final comments. If you want to discard the log file at that time there is a button to do that.
The comments can be read in the file or are displayed as a tool tip when you mouse over the file details in the Analyze tab.