Tracking a Target

Contents
To track a target you need to:
1. Be connected to the mount by clicking the "Connect" button on the main window
2. Have loaded a target's ephemeris data into the main windows from the JPL Horizons web site. Alternatively you could also load a previously saved data set.
From this window you can track a target now or at a future time. In order to track an object the ephemeris data must have time entries available for the time during which you want to track it.
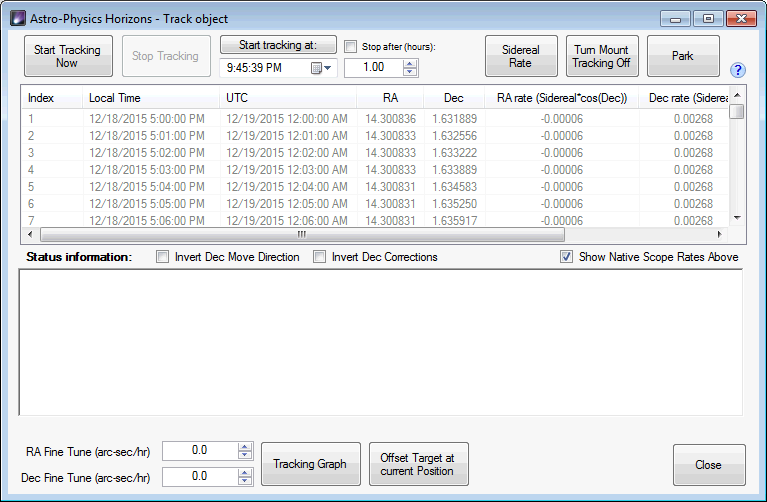
Start Tracking Now - Click to immediately start tracking the target. The mount will slew the telescope to the target, perform a short calibration, slew one more time, then start tracking. The Status Information field will indicate status as this happens.
Stop Tracking - Click to stop tracking. It is only active when tracking is active.
Start tracking at: - Click to start tracking at a specific time. The time and date can be set in the field directly under this button.
Stop after (hours) check box - if checked mount tracking will be completely stopped after the interval in hours in the field below this check box. This field applies both to the Start Tracking Now and Start Tracking at buttons. The time is measured from when tracking actually begins. This field is "live", meaning you can turn it on or off, or change the hours value while tracking Be careful if you lower the value while tracking as you can trigger a stop tracking event.
Sidereal Rate - click to set the mount to Sidereal tracking rate. Best used when tracking is off as Horizons can change the rate while tracking.
Turn Mount Tracking Off - turns tracking completely off.
Park - parks the telescope.
Tracking Table
![]()
This table contains relevant entries from the target's Ephemeris data. The table contains:
Index - line number in the table.
Local Time - local time for the entry in the table.
UTC - universal time for the entry in the table.
RA - the target's Right Ascension value.
Dec - the target's Declination value
RA Rate - the instantaneous RA rate of the target at the time.
Dec Rate - the instantaneous Dec rate of the target at the time.
Azimuth - azimuth of the target at the time.
Altitude - altitude of the target at the time
Magnitude - if magnitude is available, the estimated magnitude of the target at the time.
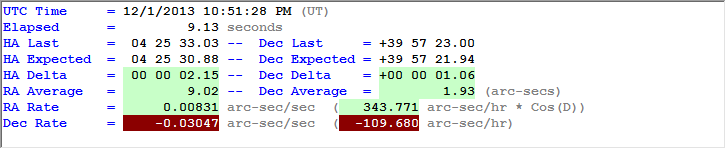
Status Information
This shows the the tracking status of the target. Values with light green backgrounds signify a positive value (greater or equal to zero). Negative values, except for HA Expected and Dec Expected, have a dark red background with white text.
Other options
Invert Dec Move Direction check box - used for debug. Will reverse declination move direction.
Invert Dec Corrections check box - also used for debug. Check this box if you experience a "Declination runaway" in the closed loop logic.
Show Native Scope Rates Above: when checked the native Astro-Physics mount tracking rates are shown (recommended).
Disable closed-loop corrections check box - Horizons uses closed-loop tracking, which means that it checks and adjusts the RA and Dec to make sure it matches the RA/Dec coordinates of the object. After checking this option Horizons will still constantly adjust tracking rate to match the target's rate but it will not recenter the target. You could then place the target anywhere in the field of view without Horizons trying to recenter the target.
RA Fine Tune (arc-sec/hr): If you are not using APCC Pro or not using an APPM pointing model then tracking might not be perfect because of polar misalignment, flexure, refraction, etc. You can fine-tune the RA tracking rate with this setting in units of arc-seconds per hour.
Dec Fine Tune (arc-sec/hr): If you are not using APCC Pro or not using an APPM pointing model then tracking might not be perfect because of polar misalignment, flexure, refraction, etc. You can fine-tune the Dec tracking rate with this setting in units of arc-seconds per hour.
Offset Target at Current Position button - This option is only available with APCC Pro. It allows you to offset a target for better image composition. To use it do the following:
1) Reposition your target.
2) Click the Offset Target at Current Position button.
To exit this mode you need to stop and restart tracking the target.
Tracking Graph button - available only with APCC Pro. This opens a graph showing the tracking delta values over time.