3D Scope Window

Contents
There are several ways to monitor the position of your telescope via the Telescope Position Group Box, which is always visible on the Main Window.
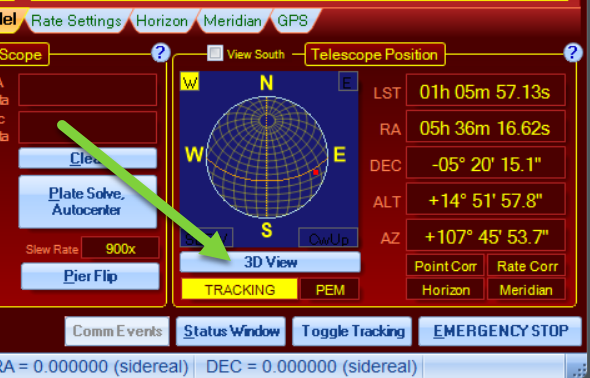
•Altitude and azimuth position values: These values are dynamic and change as your mount moves.
•Virtual Sky Window View: When APCC is connected to the mount, the scope's position is shown by a red square in the Virtual Sky Window view. The pier side is shown in the upper left and right with either an E or W within a yellow box.
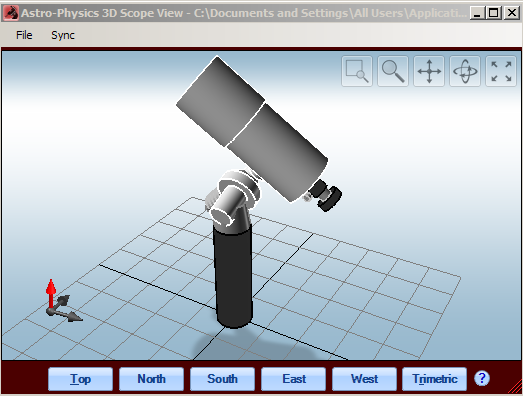
•3D View: This button will bring up a new window that provides a graphical representation of your mount and telescope based on the data that you provide in the 3D Scope Editor and position data. Note that dimensions of the mount itself cannot be edited at this time. However critical dimensions of the telescope, dewcap, focuser, camera, counterweights and pier can be specified. Refer to the 3D Scope Editor section for specific details.
•Opening Calibration Warning and Clutch Reminder: When you open up the 3D View Window, a warning box will appear to ensure that the mount is correctly calibrated. In order for the 3D View's Error Warning to function, the mount must be correctly calibrated with the night sky when the window is opened. This warning and reminder are intended for portable users who must set up anew each time they go out. When you click the button to open the 3D View Window, the following box will appear:
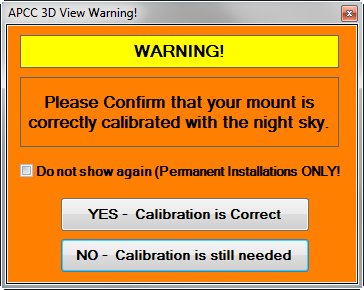
If you have not yet re-calibrated the mount on a star, then click NO - Calibration is still needed. Both the warning and the 3D View will close, and you will be given the opportunity to get calibrated.
If your calibration is correct (...and it does NOT need to be plate-solve perfect for this!) click on the "YES - Calibration is Correct" button. If you are in a permanent setup where your mount is always properly calibrated, check the "Do not show again: check-box so you don't have to bother with this each time you open the 3D View Window.
When you click the "YES - Calibration is Correct" button, a reminder box appears. It is important that you understand, and that you remember that the validity of the calibration only remains as long as the mount is not moved via the clutches.
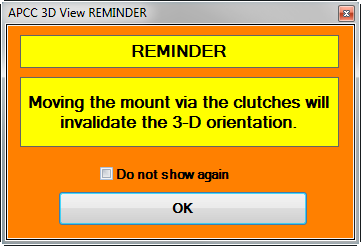
Again, we have provided a check-box for permanent installations so that you don't need to check this each time you open the 3D View window.
TIP: If you need to use the clutches to move the mount for re-balancing or some other purpose, simply close the 3D View window. Once you are finished with the clutches, just recalibrate in any normal fashion (i.e. reference park position or calibration on a star), and then open the 3D View window back up. |
Error Warning
Please refer to the separate Error Warning Section for details
Perspectives
Select the perspective that you wish to view: Top, North, South, East, West or Trimetric. Examples are shown below.

Top View

North View

South View

East View

West View

Trimetric View
In the Trimetric view, 3 axes have different angles from each other. Note that in addition to the red zenith arrow, the north and east arrows display as well.
Functional Icons
In order to fully understand how you can utilize these icons, we encourage you to experiment. When you activate each icon, the cursor will change to suit the function and the icon button will turn blue.
![]()
Zoom Window: Allows you to create an enlargement window for a specific portion of your 3D model. Left click on the icon to activate the crosshair. Scroll to move the crosshair to the desired starting position, click and draw a box, much like a crop tool in photo editing software. When you release your mouse button, the blue marked area will enlarge. To return your model to the default position, select the Zoom Fit icon.
Zoom: Allows you to zoom in gradually to the center of your 3D model. Left click on the icon to activate the magnifying glass flanked by "+" and "-" signs. Scroll across the screen to enlarge or decrease the size of the image. To return your model to the default position, select the Zoom Fit icon.
Pan: Allows you to move the 3D model to a different position within the box. This may be useful if your telescope is long or your pier is tall and you wish to fit your model within the box to its best advantage. As you move the model up and down, the perspective will shift slightly. To return your model to the default position, select the Zoom Fit icon.
Rotate: Allows you to freely rotate your 3D model to suit your needs. Note that the arrows that designate zenith, north and east will move in a corresponding manner. In this case, the Zoom Fit icon will center the mount within the frame, however does not return the position to your starting position. We suggest that you select one of the Top, North, South, East, West or Trimetric buttons to return to their default orientation.
Zoom Fit: Typically, this selection will undo the changes that were made by one of the other icon selection.
Menu Selections
Refer to the separate Menu Items section for information regarding the File and Sync drop-down selections.