Overview

Contents
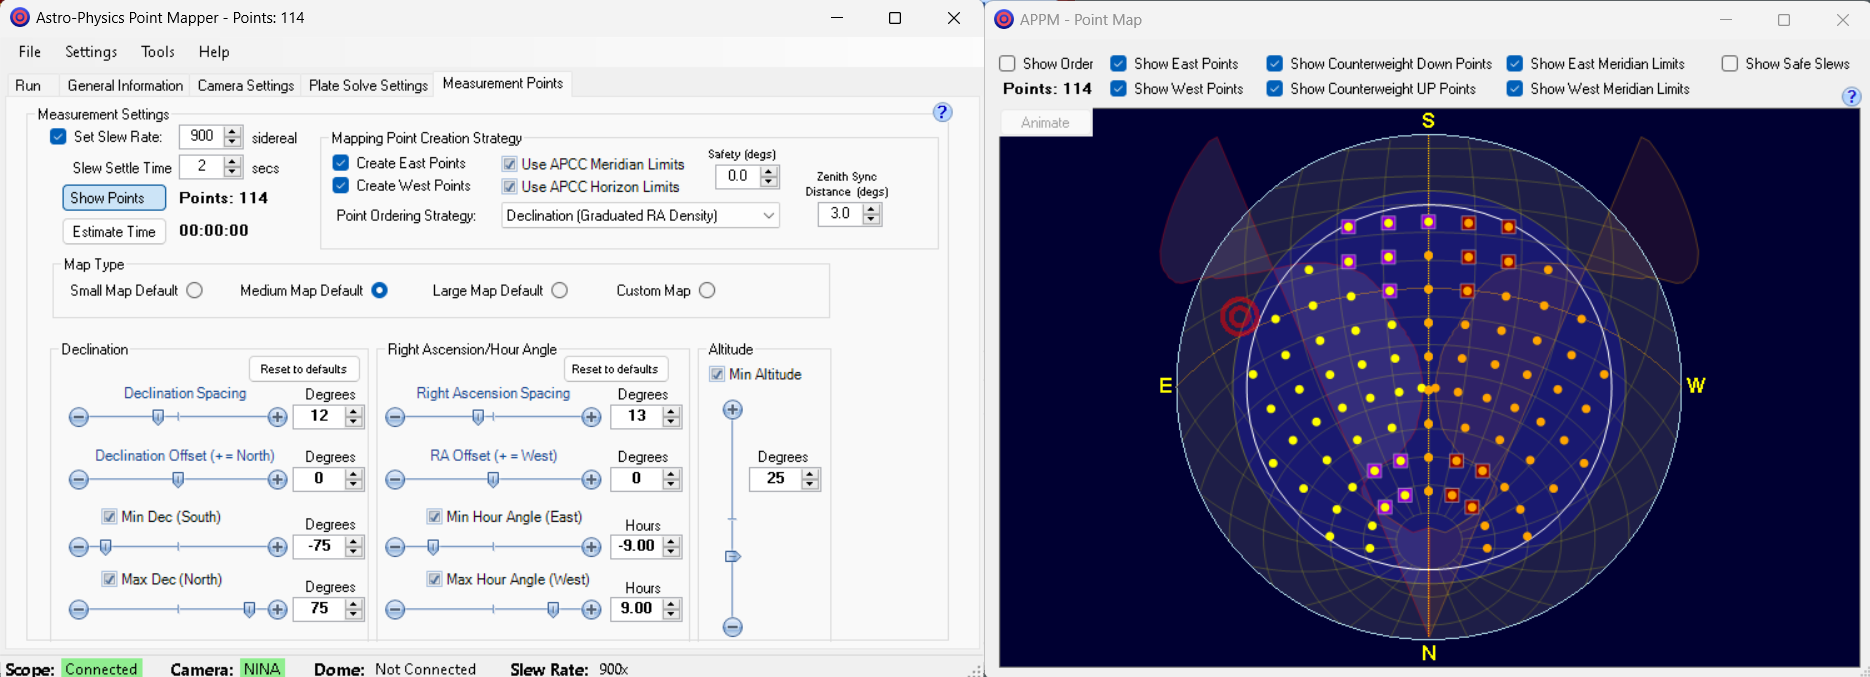
APPM, or Astro-Physics Point Mapper, is a tool that collects data points across the sky of the telescope's actual pointing position versus the targeted slew position. The difference between the actual and targeted positions is the pointing error. By systematically capturing the pointing errors throughout a set of points in the sky a pointing (correction) and tracking rate (correction) models can be created.APPM can map points on both hemispheres (East and West) and also in counterweight up positions.
Note that the process of mapping points does not make APPM "modeling software". The modeling software component is in APCC Pro, which uses the pointing data to create the actual pointing and tracking rate models.
At this time all of the mapping points must be done in one session.
Requirements
To use APPM with your mount you will need to have the following:
1) Camera Control Software and a camera supported by that software:
a) MaxIm DL Pro v5 or later -
b) CCDSoft V5
c) TheSkyX Pro Camera Add-on
d) AstroArt V3 or later
e) Any camera with an ASCOM Camera Driver
f) NINA
g) Sequence Generator Pro.
h) Meade DSI I-III cameras are also supported, but their sensors are usually not large enough to capture enough stars for reliable plate solves.
2) Plate Solving Software:
a) The full version of DC3 Dreams PinPoint application. Version 6 or later of Pinpoint is preferred.
b) TheSkyX Pro
c) Plate solving using Sequence Generator Pro
d) ASTAP
3) Optional - We recommend that you purchase an environmental sensor. This will allow APCC to compensate for changes in the environment, such as temperature and humidity for the purposes of calculating refraction accurately.
Supported environmental sensors:
a) THUM Temperature/Humidity sensor (http://www.practicaldesign.com/THUM/thum.html)
b) Devices with ASCOM ObservingConditions drivers.
NOTE: We do NOT recommend USB stick-type sensors that are inserted directly into a computer USB port or hub. These type of devices are often severely affected by temperatures of the electronics they are plugged into. The best solution would be a personal or commercial weather station that has an ASCOM ObservingConditions driver.
Using the Astro-Physics Point Mapper (APPM)
The APPM is a very powerful and versatile mapping tool. It's primary purpose is to create, and then run a point mapping that will provide the error-data needed for APCC to create a model which can then be used to determine corrections to both the pointing and the tracking of your mount. The point mapping can be custom tailored to your system, and even has a mapping strategy to facilitate domed observatories that may have rather narrow slits.
Before beginning an actual mapping run, make sure that your system is as mechanically sound as is possible. Models are predictive tools. They answer the question: "Based on previous results, how should I (the model) adjust the GoTo coordinates to increase pointing accuracy, and how should I adjust the tracking rate to achieve more accurate tracking?" No model can adequately predict random events. If it isn't repeatable, it can't be modeled! Flopping, shifting, cable jerks and even strong wind gusts that are not identically repeatable will spoil an otherwise good model. So make sure that everything is tight. Make sure your cables are free to follow the system throughout its entire range of motion, and make sure that they don't impose a heavy weight-burden on the end of the scope. Be sure that you have minimized mechanical backlash, but DO NOT set any backlash compensation in the software or in the keypad!
•In general, you will want to begin by running a point mapping in APPM to create a model in APCC. For your first try, we suggest that you run a smaller mapping on the order of 50 or so points. Then, run a small "verify" run of around 30 points to check how much the pointing has improved. A verify run uses the current pointing model and measures how much residual error there is.
•Begin the process by setting up each of the tabs in APPM. They are described in detail in the sections that follow. It is important to get the settings right, so invest some time in doing a good job on this.
•Make sure that you have set up your Meridian Limits and Horizon Limits in APCC if you wish them to be included in the point mapping.
•Spend some time changing the parameters in the Measurement Points Tab to see how they affect the point mapping.
•Run your point mapping. As the mapping progresses, make a mental note of the magnitude of the errors that are being displayed. A screen shot might also be a convenient way to document the errors. These are the raw pointing errors that the model will try to correct. Note that they will vary considerably in different parts of the sky.
•When prompted, install the data file (a PNT file) into APCC, which will then internally create a pointing model.
•Go to the APCC Pointing Model Tab and open the Pointing Model Window. Verify that the correct model has been loaded by looking at the title bar of the Pointing Model Window. The file name of the loaded model will have the time and date of the mapping. That same file name should also appear at the top of the Pointing Model Group Box on the APCC Pointing Model Tab
•Perform a Verify Run on your model. Further information is found in the Run Tab section that follows. Again, as the verify run progresses, make a mental note of the magnitude of the errors that remain. If all has gone as we hope, the magnitude of the errors will have dropped significantly from the initial point mapping run.
•Live with the model you have created for a while. Try some real astronomy with it in place and with pointing and tracking corrections turned on. Are you now always placing your target on your chip, or in the field of view of your eyepiece? Try some short unguided images. Check your results all over the sky. If you have an area of the sky that is under-performing compared to the rest, you may have a mechanical issue that should be addressed. Your initial model will probably NOT be dense enough for serious unguided work, but see what kind of results you can get.
Tip: Remember that larger, denser models involve a considerable investment of time. The value of doing the smaller model first is that it may help you discover and remedy mechanical issues that would otherwise spoil even the largest of point mappings. |
•When you feel you are ready, go ahead and run a larger, denser point mapping.
•For additional tips and unique ways to use the Astro-Physics Point Mapper, see the Advanced Topics section.